simple-spectro
Very cheap, autonomous and precise spectrophotometer for DIY biology and chemistry.
This project is maintained by Hackuarium
DIY spectrophotometer
How to use it ?
Please check the userguide to obtain all the useful information about the user interface.
Goal of the project
This project was done at the Hackuarium association, a DIY biology hacking-space and open laboratory located in Ecublens (Switzerland). Feel free to contact us if you would like additional information or would like to buy a fully built and tested spectrophotometer.
Recently, the open-source and open-hardware community has been involved in the creation of open scientific tools. In this context, a few spectrophotometer projects emerged. However, none of them was sufficiently evolved to be casually used in a laboratory. It is for this reason that we started this project. Our goal was to create a simple spectrophotometer that measures the absorbance of a sample for 3 different light colors (red, green, blue), that is self-contained (battery powered) and displays the result on a LCD screen. In addition, the tool had to be reliable, precise and cheap.
The initial idea was that you could teach spectrophotometry without having to buy an expensive instrument, since you can find experiments that do not require a specific light wavelength. This includes optical density for bacteria culture, determination of a pigment’s concentration in a solution, determination of the kinetic of a reaction and many others.
The device is rather cheap, for you can buy all the components on AliExpress (but one) and either 3D print or laser cut the case (MDF or acrylic glass). When constructing 10, the price per spectrophotometer is around $30. However if you want to have a final product with an aluminium case and PCBs already assembled, the cost would rather be $90 each if you order 20 of them.
Can we do science with this ?
Before trying to explain how it is done more in detail maybe the first question that we should answer is : can we do science with this tool? When thinking about the design of the spectro, we found an light sensor that converts the light energy to frequency and that is linear on a range of nearly 10^6. This means that the luminosity range that we can measure precisely is really big. Only the precision of the component is therefore really promising and shows that we could do something that gives good results.
And indeed, the final product gives really accurate results in fields like:
And other, which you can see on our lab notebook.
Some of our results
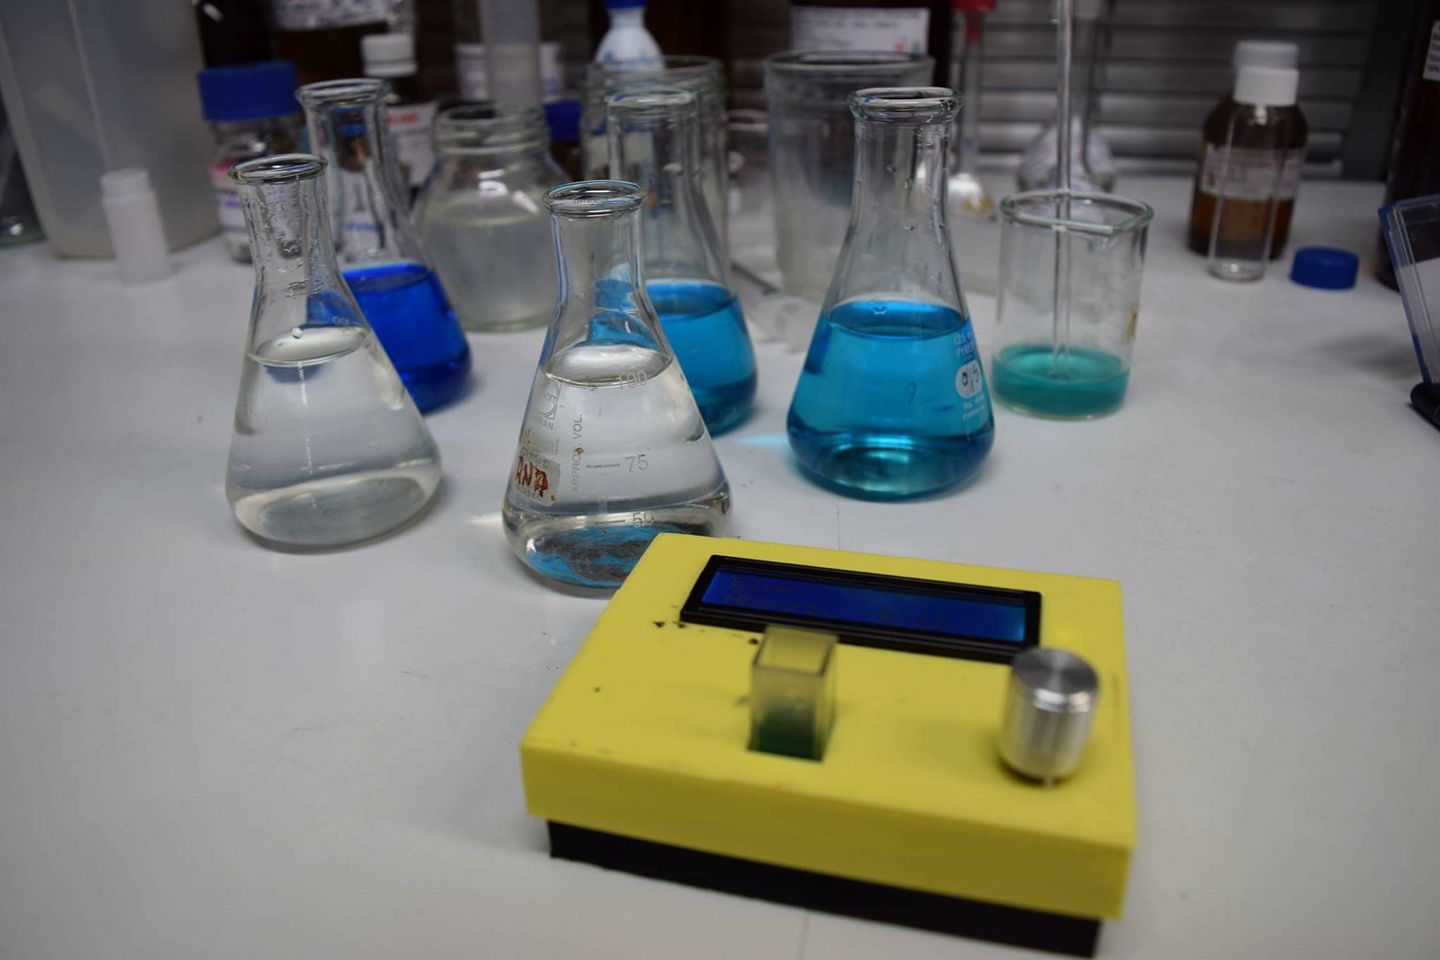
Patent blue V
To begin we did a very simple experiment that allows to measure the absorbance of solutions containing different known concentrations of patent blue V (E131), a blue pigment that is used in various blue candies.
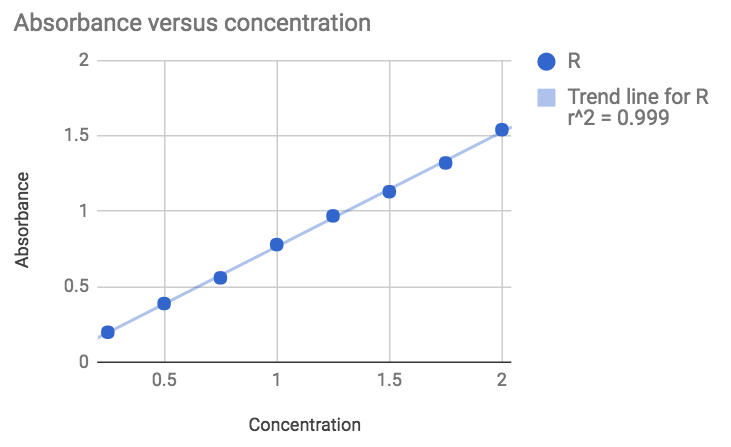
The result is rather good knowing that the solutions were simply prepared by adding various volumes (0 to 2 mL) of a concentrated pigmented solution with a 1mL seringe to 100mL of water. Not the most accurate method…
Escherichia coli
Another feature of the simple-spectrophotometer is that it works on a rechargeable battery (autonomy of 48 hours). Consequently, you can measure a kinetic by placing the device directly inside an incubator, which is not feasible with a regular commercial spectrophotometer.
Optical density (OD) at 600nm is often used in biology to determine the biomass increase versus time. In this experiment we have placed Escherichia coli with cell growing media directly in the spectrophotometer cuvette and placed the spectrophotometer itself on a shaker in the incubator. We can then program it to measure the absorbance every X seconds. In our case we measured the absorbance every 30 minutes (up to 40 measures). The following curve was obtained.
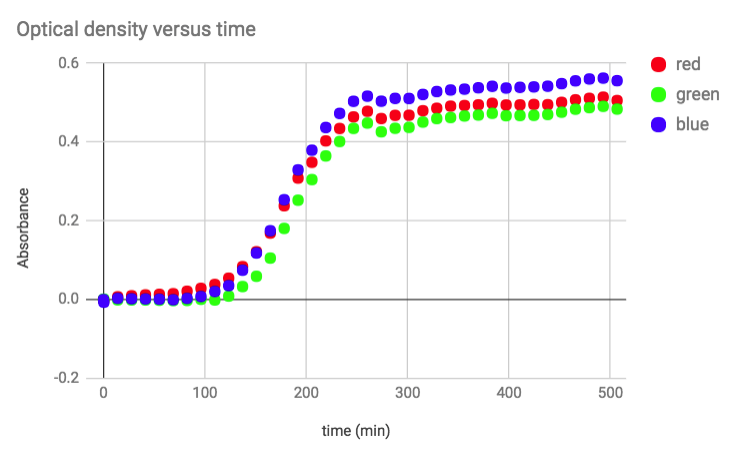
This experiment clearly shows the log phase and the stationary phase. But the growth was faster than expected. An acquisition every 15 minutes would have been a better choice.
Using the simple spectrophotometer to teach science
The use of the spectrophotometer is rather simple. Just put a blank, press the button, wait 10s and put the sample. The result is displayed on the screen. In addition, it could be open so that students could see how it is inside and could really understand how the tool works (avoiding the “black box” effect). Also, since it is inexpensive, having ten of these for a classroom would be possible, which would allow students to have one instrument per pair.
For all this reason, we also consider our instrument as a pedagogical tool. This allowed us to use it to teach some basic scientific concepts to groups of children and teenagers.
How to make it ?
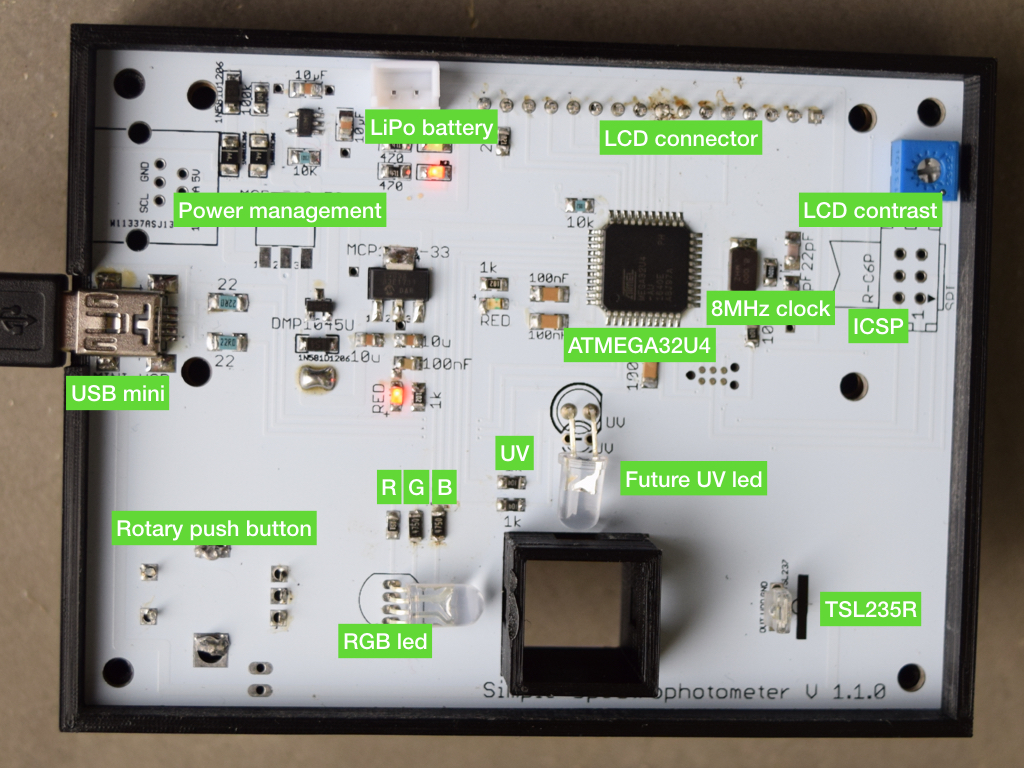
The electronic design is compatible with the Arduino platform. We use an ATMEGA32U4 microcontroller which is directly connected to the peripherals we need for this spectrophotometer.
We prefer to design the full PCB rather than to make a shield for an existing Arduino board. Indeed, the extra work to add the microcontroller is rather limited, so it does not make sense from our point of view to create a shield. Also, the resulting board is smaller and more reliable.
All the components we use but one are mainstream and can be found on eBay or AliExpress. The only special component is the light to frequency converter TSL235R that we buy on Mouser website.
For more details about the construction process, follow one of the links underneath.
- The PCB (using eagle)
- The case (using FreeCAD and OpenSCAD)
- The software (using Arduino)
Experiments
Tests
Underneath, you will find some of the tests we have run to verify the quality of our spectrophotometer.
Workshop
We regularly organize one day workshops “Build your own spectrophotometer” during which the participants learn all the process we went through to obtain the final product and build their own spectrophotometer. Please contact us if you are interested by this kind of workshop.
Here are the slides of the presentation we make during the workshop.
Cloning the project
This project uses SUBMODULES.
In order to clone it use:
git clone --recurse-submodules https://github.com/hackuarium/simple-spectro
To update the submodules:
git submodule update --recursive --remote